

Clever Single Sign-On - Overview
Walk through Clever’s OAuth 2.0 authorization code flow for the SSO portion of an SSO + Rostering integration.
Clever Complete Agreement RequiredThis feature is included with a Clever Complete subscription. Sign up here or email your Application Success Manager to learn more.
SSO-only integrations are no longer supportedClever no longer supports new standalone SSO-only integrations. To implement district-managed Clever SSO, your application needs a Clever Complete agreement and should use SSO as part of an SSO + Rostering integration.
If you need access, contact your Application Success Manager or [email protected].
Clever Library integrations are no longer offeredClever no longer offers Clever Library integrations. Use this guide as part of a supported SSO + Rostering integration.
Use this page to walk through Clever’s OAuth 2.0 authorization code flow and retrieve user data with an SSO bearer token.
When to use this guide
This guide is useful if you:
- are getting started with Clever Single Sign-On
- plan to build the SSO portion of an SSO + Rostering integration
- want a simple introduction to the OAuth 2.0 authorization code flow
- have access to a command line with cURL
- are not hosting anything at
https://localhost:3000in your local environment
Not what you're looking for?
- For a more detailed OAuth/OIDC flow walkthrough, see Example OAuth/OIDC Walkthrough.
- For SAML guidance, see SAML.
How Clever SSO works
Clever uses OAuth 2.0 and the related OpenID Connect (OIDC) standard for user authorization and authentication.
Clever uses the authorization code grant type. In this flow, a user authenticates with Clever, Clever redirects the user back to your app with an authorization code, and your app exchanges that code for an access token.
In this guide, you will:
- Generate an authorization code
- Exchange the code for an access token
- Use the token to call the Clever API
If you cannot use the authorization code grant type, contact Clever Support.
For reference:
Key terms
DefinitionsThe bolded terms in this section are used throughout Clever’s SSO documentation.
- Access Token
- A credential used to access user data.
- Do not confuse a user-level access token with a district-level token. A user-level token authorizes access only to that specific user’s data, while a district token grants access to data across a district. To learn more, see District-app tokens.
- Authorization Code Grant Type
- An OAuth grant type in which the authorization server issues an authorization code after the user authenticates and authorizes the client.
- Authorization Grant
- A credential representing the resource owner’s authorization to let your application access their data.
- Clever ID
- A globally unique identifier assigned to each data object in Clever. In API responses, this value appears as
id.
- A globally unique identifier assigned to each data object in Clever. In API responses, this value appears as
- Client
- An application making protected resource requests on behalf of the resource owner and with its authorization.
- Discovery Endpoint
- An endpoint that provides configuration details about the OpenID Connect authorization server. The client makes an HTTP GET request to
/.well-known/openid-configuration, and the server returns the OpenID Connect configuration document.
- An endpoint that provides configuration details about the OpenID Connect authorization server. The client makes an HTTP GET request to
- Identity Token
- A JSON Web Token (JWT) that conforms to the OpenID Connect specification and contains identity claims.
- Primary Redirect URI
- The first redirect URI in your list of redirect URIs. When an SSO request does not specify a redirect URI, Clever uses the primary redirect URI.
- Redirect URI
- The location where the authorization server sends the user after the app is authorized and an authorization code is granted.
- Clever always uses the first redirect URI listed in your App Dashboard settings for Clever Portal-initiated logins.
- Userinfo Endpoint
- An OAuth 2.0 protected resource where client applications can retrieve consented claims about the logged-in user.
Step 1: Generate an authorization code
The OAuth 2.0 authorization code flow starts when a user initiates SSO. This can happen when the user clicks an app icon in the Clever Portal or a "Log in with Clever" button on your website.
When the user authenticates with Clever, Clever sends an authorization code to the redirect_uri.
Clear existing Clever sessionsBefore you start, make sure you do not have an existing Clever session in your browser. For the best experience, use a private or incognito browser window.
Open this link to generate an authorization code:
Then sign in with these credentials:
- Username: [email protected]
- Password:
clever
After authentication, Clever redirects you to a localhost address. The authorization code appears in the browser URL.

An authorization code appended to a redirect URI. This represents the first step in the authorization code flow.
Step 2: Exchange the code for an access token
Copy the authorization code from the URL and replace ENTER_CODE_HERE in the cURL command below. Keep the double quotes around the code value.
The authorization header uses this format:
Authorization: Basic " + Base64.encode(client_id + ":" + client_secret)
curl --request POST \
     --url https://clever.com/oauth/tokens \
     --header 'Authorization: Basic MDk1YjgyY2JiZDhjNjg3MTRkMWM6NGIzMzg0ODljZWI0YmVjMzYyNDYxYTdjOTZlM2FhNjA5ZWZmZjA0OQ==' \
     --header 'accept: application/json' \
     --header 'content-type: application/json' \
     --data '
{
  "code": "ENTER_CODE_HERE",
  "grant_type": "authorization_code",
  "redirect_uri": "https://localhost:3000"
}
'
Run the command. If the request succeeds, Clever returns an access token.
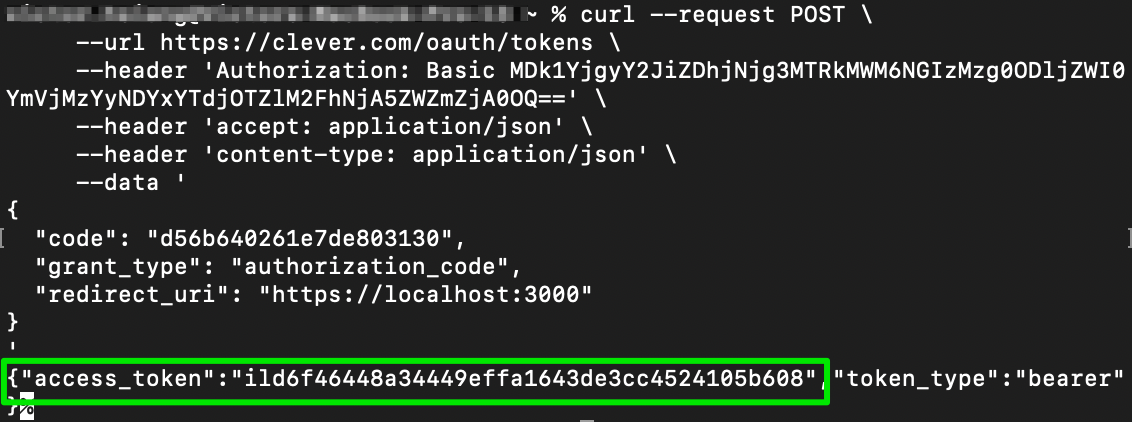
An access token retrieved from the Clever /tokens endpoint by exchanging an authorization code.
Step 3: Use the token to retrieve user data
Replace ENTER_TOKEN_HERE in the command below with the access token you received. This request calls the /me endpoint.
curl --request GET \
     --url https://api.clever.com/v3.0/me \
     --header 'Authorization: Bearer ENTER_TOKEN_HERE' \
     --header 'accept: application/json'
The response should look similar to this:

Want to test using Postman?Start with Exploring the Clever API.
Updated 4 days ago