Concept Guide
This page will walk you through the key concepts behind a migration from v2.x contacts to v3.x contacts.
Deprecation Notice
On July 31, 2025, Clever will be deprecating the API v2 contacts endpoint. You will need to update your Clever integration to use the contacts endpoint in API v3. There is no planned deprecation for other endpoints in API v2, so your integration can continue using any other API v2 endpoints as desired.
We estimate the migration will take 1-4 weeks depending on your current integration setup and engineering resources.
The API v2 contacts endpoint assigns a single relationship to each contact, which can result in inaccurate or misleading data when a contact is associated with multiple students.
API v3 resolves this issue by allowing contacts to have distinct relationships for each associated student, ensuring accurate and reliable data.If you have questions, please reach out to [email protected].
Pre-Requisites
You will not be able to complete this guide without having met the requirements below. Please take the time to read through each resource before you proceed.
- Access to Clever's Postman Collection.
- Follow this guide: Exploring the Clever API.
- Be sure to fork the collection named "Contacts v2.x Deprecation".
- Be sure to fork the environment named "Contacts v2.x Deprecation".
- Baseline understanding of Migrating from v2.x Contacts to v3.x Contacts.
Getting Started
In this guide, we're going to explore the key concepts to consider when migrating off of v2.x contacts and migrating over to v3.x contacts.
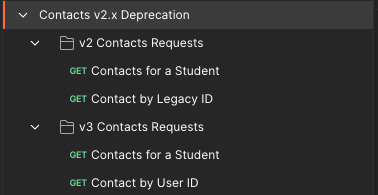
As you explore this collection, take note of the separate folders for each of the major version of the Clever API.

These folders should contain the necessary API calls to help you quickly understand the differences in how contacts are managed between the two major versions of the Clever API.
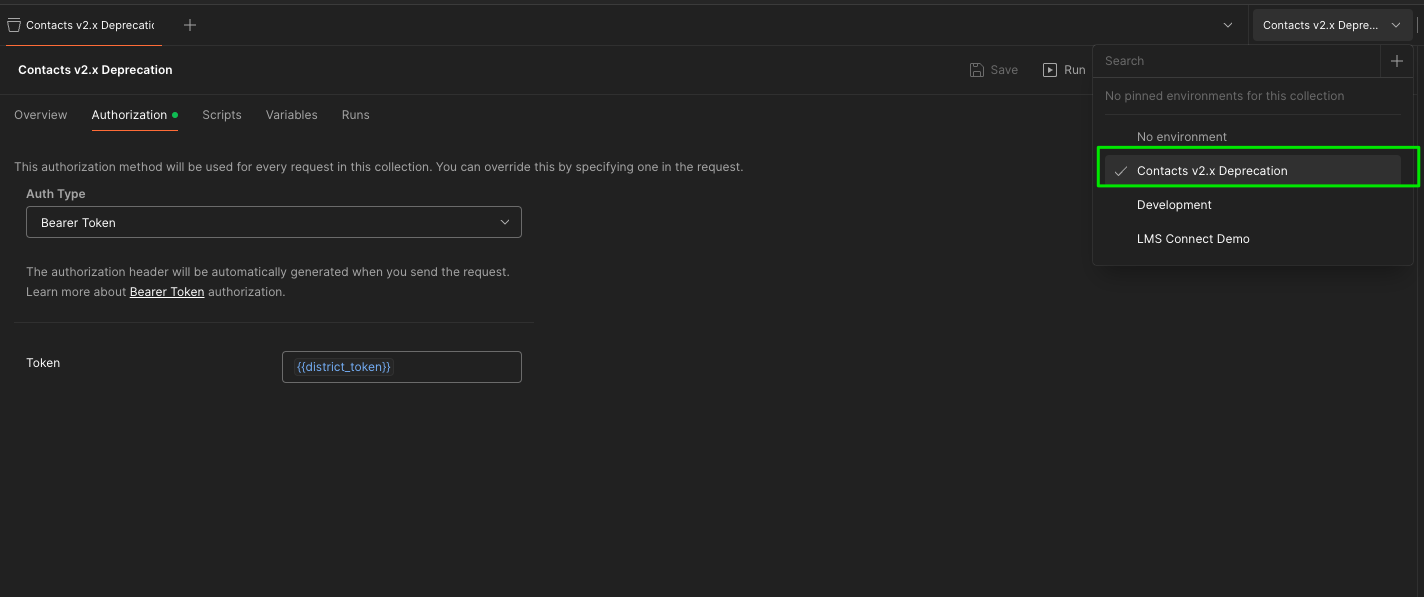
Be sure to set your Environment to "Contacts v2.x Deprecation" in the top right corner before proceeding.

New Contact Clever IDs
Click into v2 Contacts Requests > Contact by Legacy ID. The API endpoint we're working with is shown below:
https://api.clever.com/v2.1/contacts/{id}
As is the convention with v2 of the Clever API, each user type has its own endpoint. To find a specific contact, you would provide the contact Clever ID as the final part of the API endpoint URL. This contact Clever ID will now be known as the "legacy ID". This is because v3 of the Clever API introduces a new primary identifier. To learn more about this new identifier, take a look at this documentation.
Go and click "Send" to make the API call. Take note of the idvalue in the response.
Now, let's take a look at v3 Contacts Request > contact by User ID. The API endpoint we're working with is shown below:
https://api.clever.com/v3.0/users/{id}
Notice that we now make a call to a generic users URL to retrieve contacts. The ID used to identify the user in the API call should differ from the id value found in the last step. However, upon clicking "Send", you should find that the response returns the same contact as in the last step. You should also see the last id value in the newlegacy_id field.
The takeaway here is that the same contact user will have a different Clever ID depending on which major version of the Clever API you're using. The legacy_id provided in the v3.x response should serve to help you with your migration efforts. Additionally, you can make use of our v3.0 Migration Tool
Improved Student Relationships
As is described in this documentation, v3 contacts is structured in a way that allows the same contact to be associated with multiple students, but still have distinct relationship types with each student. Let's use this Postman collection to see an example.
Take a look at the v2 response:
{
    "data": {
        "phone": "(688) 145-6088",
        "district": "62817af12d430f5d54001f99",
        "phone_type": "Other",
        "relationship": "Parent",
        "sis_id": "603",
        "email": "[email protected]",
        "students": [
            "62817c88dc4dc002ea40b502",
            "674dfb9421346c4b2f3612f5"
        ],
        "name": "Salman Herzog",
        "type": "Parent/Guardian",
        "id": "674dfb9421346c4b2f3612ff"
    },
    "links": [
        {
            "rel": "self",
            "uri": "/v2.1/contacts/674dfb9421346c4b2f3612ff"
        },
        {
            "rel": "district",
            "uri": "/v2.1/contacts/674dfb9421346c4b2f3612ff/district"
        },
        {
            "rel": "students",
            "uri": "/v2.1/contacts/674dfb9421346c4b2f3612ff/students"
        }
    ]
}
While this contact is associated with two students, notice that their relationship field is listed as "Parent". Based on this structure, it is easy to assume that this contact is a parent of both students.
Now, let's take a look at the v3 response:
{
    "data": {
        "created": "2024-12-02T18:25:30.470Z",
        "district": "62817af12d430f5d54001f99",
        "email": "[email protected]",
        "last_modified": "2024-12-02T18:39:37.832Z",
        "name": {
            "last": "Salman Herzog"
        },
        "id": "674dfb9421346c4b2f36130d",
        "roles": {
            "contact": {
                "phone": "(688) 145-6088",
                "phone_type": "Other",
                "sis_id": "603",
                "student_relationships": [
                    {
                        "relationship": "Parent",
                        "student": "62817c88dc4dc002ea40b502",
                        "type": "Parent/Guardian"
                    },
                    {
                        "relationship": "Aunt/Uncle",
                        "student": "674dfb9421346c4b2f3612f5",
                        "type": "Family"
                    }
                ],
                "legacy_id": "674dfb9421346c4b2f3612ff"
            }
        }
    },
    "links": [
        {
            "rel": "self",
            "uri": "/v3.0/users/674dfb9421346c4b2f36130d"
        },
        {
            "rel": "district",
            "uri": "/v3.0/users/674dfb9421346c4b2f36130d/district"
        },
        {
            "rel": "sections",
            "uri": "/v3.0/users/674dfb9421346c4b2f36130d/sections"
        },
        {
            "rel": "schools",
            "uri": "/v3.0/users/674dfb9421346c4b2f36130d/schools"
        }
    ]
}
This v3 response reveals that this contact is actually a parent of one student and an aunt/uncle of the other.
Conclusion
Hopefully, this guide clearly illustrated the differences to consider when migrating from v2 contacts to v3 contacts. Use the Postman collection from this guide as a testing tool when planning out your migration needs.
Updated 3 months ago
